ADVANCED INTERACTIVE DESIGN- PROJECTS

16/4/20- 29/7/20 (Week 1- Week 16)
Andrea Vie Choong Jia Qi (0331945)
Advanced Interactive Design
Project 1 | Project 2 | Final Project
Interactive Application | Augmented Reality Application | Design, Exploration & Application
_____________________________________________________________________________
LECTURES
Lecture 10: Final Project Briefing | Link face expression to filter
18/6/20 (Week 10)
We were briefed on the requirements for our final project and an example is shown on what should be included. We were taught on how to link the face expression to the filter using "if then else" patch.

Lecture 11: Fixed Target Tracker Effect
25/6/20 (Week 11)
Mr. Lun shared a online tutorial on a method we can use for our final project. We had to start on our proposal and consult with him to get feedback on it.
Lecture 11: Fixed Target Tracker Effect
25/6/20 (Week 12)
This week, Mr. Lun re-explained on the requirements for our final project and shared files on the coding to navigate the microsite buttons and spark ar to create the AR effect.
Lecture 12: -
9/7/20 (Week 13)
We did not have lecture this week but we can consult our final project with Mr. Lun.
Lecture 13: -
16/7/20 (Week 14)
We did not have lecture this week but we can consult our final project with Mr. Lun.
INFORMATION
Module Information Booklet (MIB)
__________________________________________________________
PROJECT 1: Interactive Application
Idea Generation
16/4/20 (Week 1)
Idea 1: Rice Bowl Ordering System
Brief Explanation
Users customize their own rice bowl depending on the sides they want. Each customization has different categories. These include rice, meat, vegetable and sauce/garnish. After choosing their rice bowl, they can either choose a set which includes a soup of the day or an ala carte. And once they confirm their order, they can add it to cart with their current address/location. The user starts with the payment and process with the delivery order.
Idea 2: Online Movie Ticket Booking
Brief Explanation
Idea 3: Fine Dining Restaurant Reservation
Brief Explanation
Users will need to fill in the personal details, number of attendees and chose one or more course meals to be served. Then, the user needs to confirm the booking details and payment will be made. Lastly, a booking receipt will appear with a booking ID.
From the idea I have written down, I decided to go with Idea 1 as I am more familiar with the online food ordering system on meal customization. I elaborated the idea by coming up with the concept, mood board, wireframe and flowchart.
Concept (using references)
The UI layout will be minimalist and aesthetic. The information displayed will be straightforward and easy to read.
These are layout samples I was inspired by.
https://uimovement.com/design/make-your-own-salad_3_trimmed/
https://dribbble.com/shots/5410284-Smoothie-Land
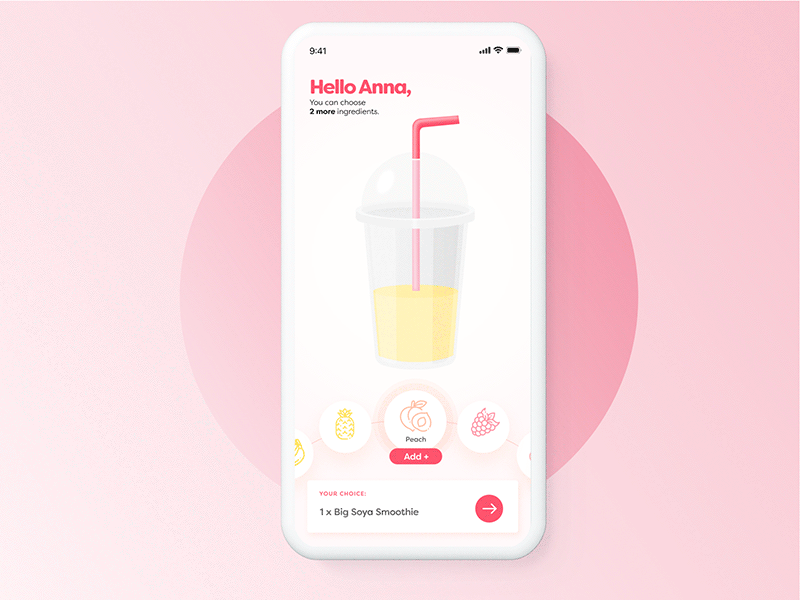
Mood Board
https://dribbble.com/shots/5410284-Smoothie-Land
Mood Board
Layouts

Fig 2.1 Mood Board #1

Fig 2.2 Mood Board #2
Colour Palette

Fig 2.3 Colour Palette
Typography

Fig 2.4 Typography
Wireframe (Lo-fidelity)

Fig 2.5 Lo-fidelity Wireframes: Landing Screen

Fig 2.6 Lo-fidelity Wireframes for Customization screen 1-2

Fig 2.7 Lo-fidelity Wireframes: Order List screen, Payment screen

Fig 2.8 Lo-fidelity Wireframes: Confirmation of order placement
Wireframe (Lo-fidelity): User Experience


Fig 2.9 User experience #1


Fig 2.10 User experience #2

Fig 2.11 User experience #3
Flowchart
UX: User orders customized rice - confirms order - proceeds to payment

Assets Creation
23/4/20 (Week 2)
This week, I consulted my final idea for my interactive application to Mr. Lun. After my idea was approved, I started to work on my assets for each screen that I am going to animate and place them in my screen layout in Adobe Animate.
I used Adobe Illustrator to create my assets.

Fig 2.13 Progress on creating assets in AI
Transfer assets & design layout in Adobe Animate
30/4/20 (Week 3)
This week, I started to do my screens on Adobe Animate along with the assets I designed in AI. I placed the elements for the screens first and later I will animate each screen one by one.
I changed the AI assets into movieclip files and created the text and buttons in Adobe Animate for each screen.


After creating all the assets, I moved on to structure each layout of the screens as the hi-fidelity prototype.


Advanced Interactive Project 2 Proposal by Andrea Choong

Fig 2.14 Changing AI assets images to movieclip image files

Fig 2.15 Creating text movieclip

Fig 2.16 Creating button (up, over, down, hit)

Fig 2.17 Progress of layout: Screen 1

Fig 2.18 Progress of layout: Screen 2

Fig 2.19 Progress of layout: Screen 3

Fig 2.20 Progress of layout: Screen 4

Fig 2.21 Progress of layout: Screen 5
Animate screen 1-4
7/5/20 (Week 4)- 14/5/20 (Week 5)
After the layout is completed, I moved on to the animation part. I wanted to keep my animation simple and have a smooth transition.
Here is the progress of animation for screen 1 and 2:
Here is the progress of animation for screen 3 and 4:
Touch up details & Animate screen 5
14/5/20 (Week 5)- 21/5/20 (Week 6)
After the four screens are done, I moved on to animating the 5th screen and add some touch up details to all the screens.
Here is the progress for screen 5:
When I played back the whole animation, it does look complete a the end so I added one more screen to state that the order is placed after the payment is made.
Here is the progress for the final screen:
Adding background image behind the UI
21/5/20 (Week 6)
Once the whole animation for the ui is completed, I wanted to add a rice-related dish as the background image from the lecture I learned. I searched for a non-copyright image from Pexels.
Fig 2.22 Chosen background image: Rice bowl
After the background image is chosen, I attached a new CSS file to the default template created from Adobe Animate. I added the background image coding into the CSS.
Fig 2.23 CSS to add the background image
After the background is done and the UI animation is checked, I submitted my project and recorded the final outcome:
__________________________________________________________
PROJECT 2: Augmented Reality Application
PROJECT 2: Augmented Reality Application
Generate Ideas / Final Idea Proposal
28/5/20 (Week 7)
This week, we had to think of an idea that falls on either one of the four categories:
1. Campaign awareness
2. Online shop (testing different glasses, lipstick, eye makeup)
3. Selfie/fun filter
4. Mask
And from that, we need to create a simple AR application that plays around with face/head tracker, background replacement and native UI picker.
Here is my proposed idea:
Idea 1: AR Online Store for Sunglasses
Brief outline:
This application allow users to try on different sets of glasses using face recognition where users can see how they will look like with a specific type of sunglasses.
Idea 2: AR Plant Filter
Brief outline:
This application allow users to try on a filter where they become different types of plants using face recognition. There are several sets of buttons below to choose which plant they want to portray as and it will also educate users on short tips on caring those plants at home. The background would be either in the garden or in the living room at home.
Idea 3: Malaysian Kuih Filter
Brief outline:
This application allow users to try on a filter where they can become different Malaysian kuih. The buttons are there to allow users to change the filter to a ang gu kuih, kuih lapis and kuih inti. The kuih names will appear above the filter. The background would a old coffee shop with people eating/chatting.
From these 3 ideas, I would want to focus on executing the 3rd idea on the Malaysian kuih AR filter.
Progress of creating kuih assets & button icons
4/6/20 (Week 8)
I worked on illustrating the kuih assets and button icons for my AR filter using references I gathered in my proposal.
Here is my progression:

Progress of creating filter in SparkAR
11/6/20 (Week 9)
After illustrating the kuih, I transferred the assets into SparkAR and did the face masking using plane and created the UI picker options and background.

Fig 3.2 Progress for face masking & ui picker 1

Fig 3.3 Progress for face masking & ui picker 2

Fig 3.4 Progress for face masking & ui picker 3
Progress on Mouth Open Interaction
18/6/20 (Week 9)
This week, I made the mouth open interaction in the patch editor so that my animation sequence of my filter changes when the user opens his/her mouth.

Fig 3.5 Progress in creating mouth open interaction
User Testing of AR Face Filter
25/6/20 (Week 11)
After my filter is completed, I tested the filter on my sister to see how the filter works on a real user's face.
Here is the final outcome:
__________________________________________________________
FINAL PROJECT: Design, Exploration & Application
FINAL PROJECT: Design, Exploration & Application
Ideation / Proposal
25/6/20 (Week 11)
This week, I started on my proposal on my idea for the final project.
Here is my proposal below:
Taylor's Merchandise AR App by Andrea Choong
Simple Testing of scanning AR Effect | Planner Design /Mockup | AR Info Box Design
2/7/20 (Week 12)
This week, I did a simple testing to see if my logo can be track using SparkAR and whether my effect appears accordingly.

Fig 4.1 Progress of creating a simple AR effect as a test
Final Outcome:
After the testing is done, I moved on to design my planner cover in Canva and place the cover design onto a mockup planner.
Here is the progress of the design & mockup :

Fig 4.2 Progress of planner cover design

Fig 4.3 Planner Mockup
Once the planner was designed, I moved on to design the AR info that will appear after the logo is scanned. I planned to have 5 different infoboxes showing the overall achievements of Taylor's and have them animated accordingly.
Here is the progress:
AR Info Box by Andrea Choong
Progress 1 on AR Effect | Microsite Design & Animation
9/7/20 (Week 13)
This week, I did simple testing in Spark AR using my logo tracker to see whether the AR info box effect can be easily tracked or not.

Fig 4.4 Logo Tracking Test
Final Outcome:
After the testing, I started on the microsite in Adobe Animate. But before I made the microsite, I experimented with the colour scheme onto my wireframes to see how it looks.

Fig 4.5 Colour Scheme experiment on wireframes
Here is the progress of the microsite:
Progress 2 on AR Effect | Microsite Design & Animation
16/7/20 (Week 14)
I continued with the "how it works" page and the "download" page for the microsite.
Here is the progress:
As for the AR info box, I added some red and black small triangle as a animated effect to show like a confetti to celebrate Taylor's achievements written in the info box. And it also relates to the style and design of the triangles used in my planner cover. I changed the heading of the "Download" page to "Download Our AR Effect".

Fig 4.6 Added triangles to have a similar design style

Fig 4.7 Rename heading for Download page
And I have increased the size of the info box so that it is easier to read.

Screen Capture Video (AR Filter) | QR Code
23/7/20 (Week 15)
Once the AR effect is finished, I did a screen capture video of how the AR appears when scanning the logo in Spark AR Player.
As for the microsite, I added a QR code to link the merch page to the official Taylor's Merchandise Shop website.

Fig 4.9 Adding QR code
__________________________________________________________
Final Submission
29/7/20 (Week 16)
Google Drive link to project files
Final Outcome of Microsite
Final Outcome of AR Effect
__________________________________________________________
FEEDBACK
There was no feedback this week.
23/4/20 (Week 2)
16/4/20 (Week 1)
23/4/20 (Week 2)
General feedback: Make sure to do a flowchart for your idea. Marks would not be deducted if it's not 100% correct. A flowchart is usually used by programmers during the planning phase of an application, but this is a design class. As long as the shapes/symbols are right.
Specific feedback: Mr. Lun said that my idea is good to go. He said to start on designing the graphic and elements for project 1.
30/4/20 (Week 3)
There was no feedback this week.
7/5/20 (Week 4)
There was no feedback this week.
14/5/20 (Week 5)
There was no feedback this week.
21/5/20 (Week 6)
There was no feedback this week.
28/5/20 (Week 7)
There was no feedback this week.
4/6/20 (Week 8)
Specific feedback: After showing my idea for project 2 to Mr.Lun on Monday, he commented that the proposal is good. He mentioned for the different food states, he said it is different from what he taught and I need to use the image sequence and adjust the patch editor.
11/6/20 (Week 9)
There was no feedback this week.
18/6/20 (Week 10)
There was no feedback this week.
25/6/20 (Week 11)
There was no feedback this week.
2/7/20 (Week 12)
Specific feedback: After showing my proposal for final project to Mr.Lun on Wednesday, he said it is okay so far. He suggested that I should go for the 2nd idea for the logo tracking part. As there is no need to add any function, just some animations. He said to do a basic testing to see if the logo can be scanned or not. For the microsite, add a page to introduce the merchandise.
9/7/20 (Week 13)
There was no feedback this week.
16/7/20 (Week 14)
There was no feedback this week.

Comments
Post a Comment