INTERACTIVE DESIGN- EXERCISES

4/4/19 - 23/5/19 (Week 1- Week 8)
Andrea Vie Choong Jia Qi (0331945)
Interactive Design
Exercises
Web Evaluation | User Interface | HTML Exercise | HTML & CSS Document Development
_______________________________________________________________
LECTURES
Lecture 1: Module Briefing/Web Design Evaluation
4/4/19 (Week 1)
We were briefed on the exercises and projects for this module. We were introduced to one of the software, Adobe Dreamweaver used to make websites. We discussed two common terms that are used in websites.
HTML= HyperText Marking Language
- common coding at the start of a web page
CSS= Cascading Style Sheets
- used for colour coding, font type/size
We are told to look for free web hosting sites that will help in our later projects and exercises in this module.
Lecture 2: UI & UX Design
11/4/19 (Week 2)
We learned the differences between a user interface and user experience design.
User Interface: focus on the interface on whether it is easy to access, understand and use to facilitate these actions
Examples: interaction design/visual design/information architecture (IA)
User Experience: focus on the structure and layout of a content, navigation and how users interact with them.
Examples: site-maps/user flows/prototypes/wireframes
And we watched a video on Norman door.
Lecture 3: HTML Codes
25/4/19 (Week 4)
We had a lecture on the basic codes (HTML) used in websites.
Heading 1: h1
Heading 2: h2
Paragraph: <p></p>
List: <li></li>
Ordered: <ol></ol>
Unordered: <ul></ul>
Hyperlink:
<p>paragraph<a href="https://www.lonelyplanet.com/malaysia/peninsular-malaysia-west-coast/ipoh target="_blank">Ipoh</a></p>
Image:<img src="image file"/>
Lecture 4: CSS Extra Markup
2/5/19 (Week 5)
We had a continuation of the lecture of HTML and CSS with the methods on how to include the CSS in the HTML.
Difference between a block-level & in-line element
Block-level element
- Has a new line break in between
- In box forms
- example: <h1> <h6> <ol> <ul> <li>
In-line element
- appears in a block-level element
- used for layout/display of the web
- example: <p> <img> <a> <b> <i>
What is an attribute?
It gives extra information on that element. It is the language of the HTML like <href> <title> <al>
ID/Class attribute: special name and links with CSS
What is CSS?
- creates the appearance of the HTML
- creates rule on how the content will look
- two parts: selector and declaration- within { } (e.g. property:font family & value: arial-
font family:arial; )
Lecture 5: Working with Cascading Style Sheets in HTML
9/5/19 (Week 6)
We had a lecture on how to include cascading style sheets (CSS) in our webpages (HTML).
In our exercise, we used to the first method which is inline style which means adding each CSS tag within the HTML.
*Important tags to take note in CSS:*
1. Linking downloaded fonts online to CSS
E.g. <link href="https://fonts.googleapis.com/css?family=Just+Another+Hand" rel="stylesheet">
2. Heading <h1> to <h6>
E.g. h1{font-family: 'Acme', sans-serif;
font-size: 3.5em; *we can either use em/px*
color: #000000;
text-align: center;
text-transform: uppercase;
text-decoration: none;
}
3. Ordered/unordered list <ol> <ul>
E.g. ol{font-family: 'Shadows Into Light', cursive;
font-size: 1.6em;
color: #FF0004; *we can type in the code/color name (default colours)*
text-align: center
}
4. Nested list <li>
li{list-style: none;
}
5. Highlighting a text
E.g. #aboutpara{
background-color:#FFFFFF;
font-colour:#000000;
}
6. HTML scrolling
E.g. html {
scroll-behavior:smooth;
} *use when there is "back to top" button*
7. Background image
E.g. body{background-image: url("background.jpg");
background-repeat:no-repeat;
background-attachment: fixed;
background-size:cover;
width:70%;
margin:auto;
}
8. Top Navigation Bar Link format
E.g. a:link {
color: green;
background-color: transparent;
text-decoration: none;
}
a:visited {
color: deeppink;
background-color: transparent;
text-decoration: none;
}
a:hover {
color: white;
background-color: transparent;
text-decoration: underline;
}
a:active {
color: skyblue;
background-color: transparent;
text-decoration: underline;
}
9. Syntax to allow CSS in HTML (for inline style)
E.g. <style type="text/css">
Lecture 6: -
16/5/19 (Week 7)
This week, we had a lecture on how to make a basic layout for our content using HTML and CSS.
_______________________________________________________________
INSTRUCTIONS
Module Information Booklet (MIB)
_______________________________________________________________
EXERCISES
Web Evaluation (Week 1)
4/4/19 (Week 1)
For our first class, we had to critic 6 good and 6 bad web designs based on our opinions. We had to list down the pros and cons along with the purpose and target audience of the website.
These are the two websites given:
https://www.webbyawards.com/
https://www.thebestdesigns.com/
Here are the 6 good websites:

Fig 1.1 https://hobes.co/

Fig 1.2 https://www.allthatgrows.in/

Fig 1.3 http://twentytwentytwo.co.uk/

Fig 1.4 http://jonathanpatterson.com/

Fig 1.5 https://drroebucks.com/

Fig 1.6 https://smashmallow.com/
Here are 6 bad websites:

Fig 1.7 http://themarcus.com/

Fig 1.8 http://www.kccreepfest.com/

Fig 1.9 https://merch.gunsberg.in/

Fig 1.10 https://weareoutline.com/

Fig 1.11 https://www.weareoust.co/

Exercise 2: Basic User Interface
11/4/19 (Week 2)
We are asked to design a information kiosk about Taylor's University. We had to think of our target audience and a scenario to navigate their way to a certain place in campus.
Our group decided to go with finding the lecture theaters in Block B. Our target audience is to new students.
We need to think of a easy way for them to find what they want in the user interface.

Fig 2.1 Process of planning
 Fig 2.2 Final Outcome: Homepage
 Fig 2.3 Final Outcome : Academics Page
 Fig 2.4 Final Outcome : Classrooms Page
 Fig 2.5 Final Outcome: Building Image (Block B) + Information on the lecture theater on level 2 (Hover Effect)
Exercise 3: HTML Exercise


2/5/19 (Week 5)
We had to create our own page using the HTML codes we learned during the lecture. We had to include the 4 sections of about ourselves and the things we like. Then we need to link the 4 sections to the top navigation. We need to use notepad for this exercise.

Fig 3.1 HTML Version of my page #1

Fig 3.2 HTML Version of my page #2
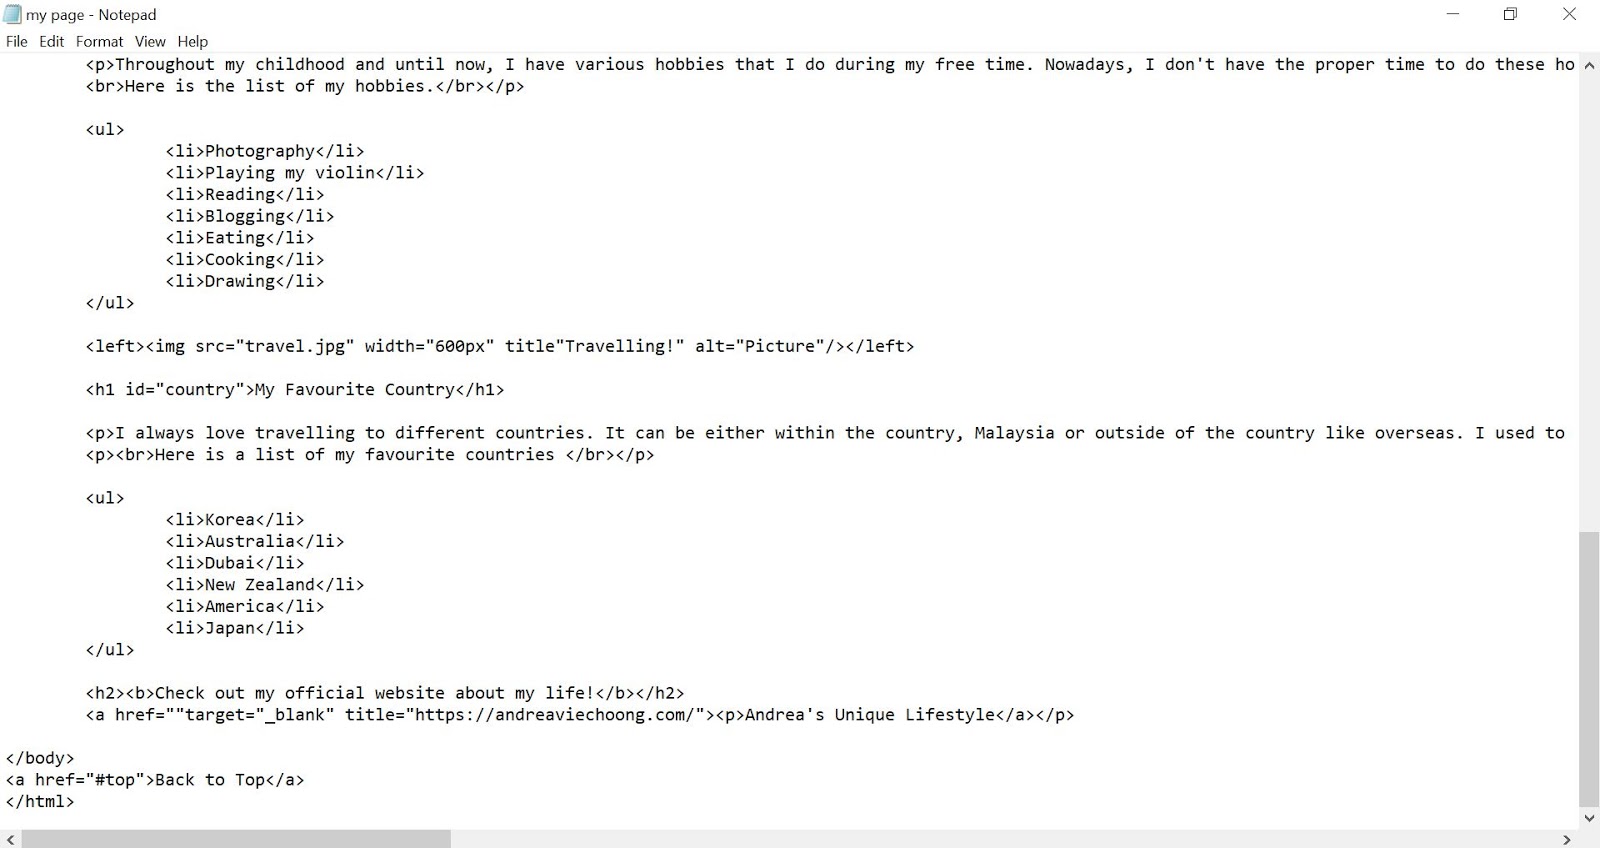
Fig 3.3 HTML Version of my page #3

Fig 3.4 Outcome of Layout- Part 1

Fig 3.5 Outcome of Layout- Part 2

Fig 3.6 Outcome of Layout- Part 3

Fig 3.7 Browser display #4

Fig 3.8 Browser display #5

Fig 3.9 HTML "Back to Top" button

Fig 3.10 HTML "Back to Top" button
Adding CSS
9/5/19 (Week 6)
We continued with the exercise we stopped last week and we did it using Adobe Dreamweaver this time. We were introduced to CSS and added the file into the HTML. We learned several ways to make our website look more better and more readable. We tested and explored the codes that were introduced and explain in class today.

Fig 4.1 Cascading Style Sheet added in HTML web page (Adobe Dreamweaver)

Fig 4.2 Outcome of Layout- Part 1

Fig 4.3 Outcome of Layout- Part 2

Fig 4.4 Outcome of Layout- Part 3

Fig 4.5 Outcome of Layout- Part 4

Fig 4.6 Outcome of Layout- Part 4

Fig 4.7 Outcome of Layout- Part 5

Fig 4.8 Outcome of Layout- Part 6

Fig 4.9 Outcome of Layout- Part 7

Fig 4.10 Outcome of Layout- Part 8

Fig 4.11 Outcome of Layout- Part 9

Fig 4.12 Outcome of Layout- Part 10
Here is the official site (000webhosting):
Exercise 4: HTML & CSS Document Development
This week, we learned how to create a simple and basic layout in Dreamweaver using the HTML and CSS. We were introduced to "header", "section", "aside" and "footer". This time we created the style sheet on its own and attach it to the HTML.
We were given a sample browser and HTML version of the layout given in Google classroom.

Fig 5.1 Sample Codes

Fig 5.2 Sample Layout (in browser)
Then we did the same layout based on our own style.

Fig 5.3 Process of creating logo & navigation menu
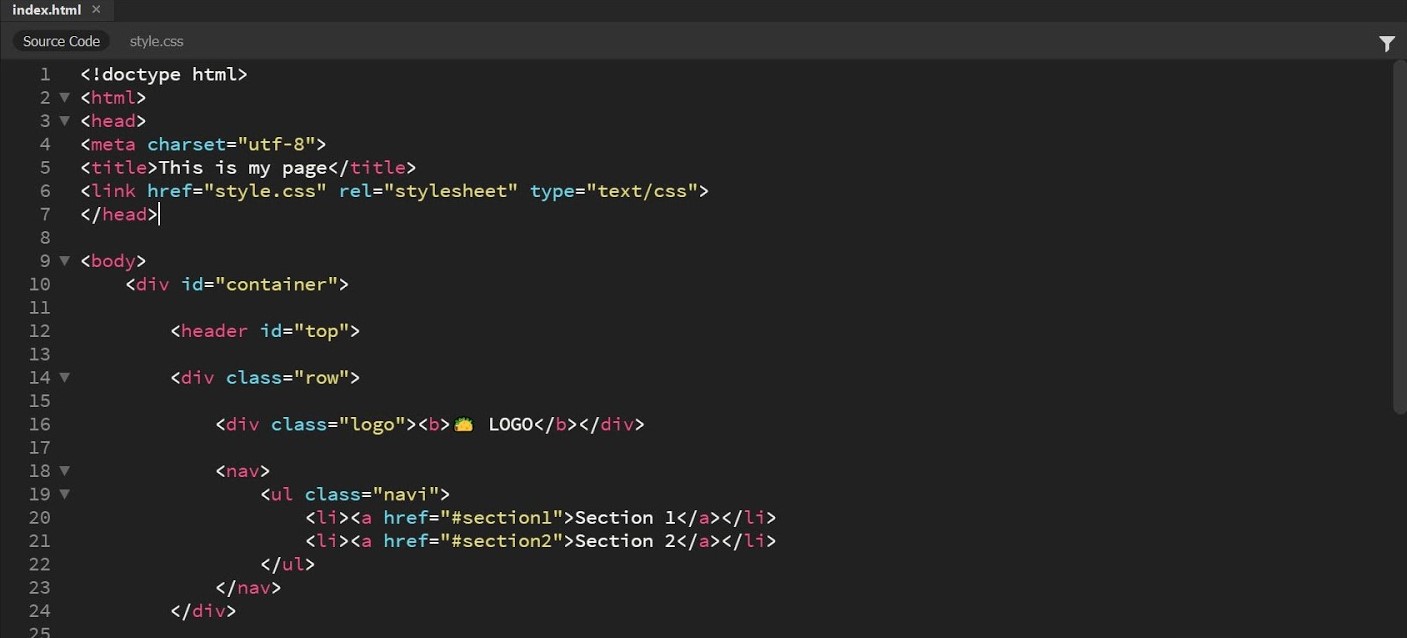
Fig 5.4 HTML Codes

Fig 5.5 CSS Codes

Fig 5.6 Outcome of Layout with logo & navigation (in browser)
After getting used to designing a layout, we did our exercise of creating a layout on our own style using the given content and images in word document.
Fig 5.7 Embedded PDF of given text, hyperlinks and images
I decided to type out the information and then add the necessary images in the HTML. After that, I continued to create the layout and styles in CSS later.

Fig 5.8 Progress on Dreamweaver #1

Fig 5.9 Progress on Dreamweaver #2

Fig 5.10 Adding hyperlink in the text

Fig 5.11 HTML Codes (in Dreamweaver)

Fig 5.12 CSS Codes (in Dreamweaver)

Fig 5.13 Outcome of Layout- Part 1 (1st attempt)

Fig 5.14 Outcome of Layout- Part 2 (1st attempt)

Fig 5.15 Outcome of Layout- Part 3 (1st attempt)
After receiving feedback, I modified my layout by adjusting the colours, removing the unnecessary block level elements, changed the background image and edit the margin and padding.

Fig 5.16 Outcome of Layout- Part 1 (Final)

Fig 5.17 Outcome of Layout- Part 2 (Final)

Fig 5.18 Outcome of Layout- Part 3 (Final)

Fig 5.19 Outcome of Layout- Part 4 (Final)

Fig 5.20 Outcome of Layout- Part (Final)
Here is the link to the official site (000webhosting site):
FEEDBACK
4/4/19 (Week 1)
There was no feedback this week.
11/4/19 (Week 2)
General feedback: When designing a user interface or user experience design, always remember to think from a user's perspective when using the application/website/product. Make sure to create the design which is easy and convenient for the users to use.
24/4/19 (Week 4)
General feedback: make sure that the codes you enter are in a correct format or else the outcome of the page will not show anything or there will be an error.
2/5/19 (Week 5)
Specific feedback: Mr. Shamsul commented that my web page was alright. He challenged me to add a "back to top" that enables to go back to the upper part of the page without having to scroll.
9/5/19 (Week 6)
16/5/19 (Week 7)
General feedback: Mr. Shamsul remind us to check the opening and closing tag properly for each element so that there would be errors when displaying in the browser.
23/5/19 (Week 8)
Specific feedback: Mr. Shamsul said that there are too many boxes for each section so I should try to reduce it. The colour used could be improved and he told me to align the logo and navigation in one line and also to align the text according to the image alignment. The section 5 would look better if the two images are both next to each other and leave the text at the bottom.
_____________________________________________________________________________
REFLECTIONS
EXPERIENCES
4/4/19 (Week 1)
While evaluating several websites, I saw many different types of creative layouts that can be created in websites and there is no fixed pattern.
11/4/19 (Week 2)
I struggled to think in some part when creating layouts that are easy for users to locate and use.
24/4/19 (Week 4)
I felt that it is must easier to find the codes you want online instead of having to memorize every single one of them.
2/5/19 (Week 5)
I enjoyed making my own page for this week's exercise and I learned a lot of the HTML coding and how it used to create the layout and display of the website.
9/5/19 (Week 6)
I had fun experimenting and exploring the css codes that were taught today in class and it was really satisfying to see how my web page is being more aesthetics with the use of CSS compared to the first time I made the page.
16/5/19 (Week 7)
I learned how to design the layout of the website using CSS so the website would be just filled with only a blank page. It was difficult at first to remember on how to create a layout but I got used to it after doing it on my own with the exercise given.
23/5/19 (Week 8)
I learned how to the image and text can be edited separately by using the "float" CSS setting. I also learned to use "clear" to adjust the bottom aside in the section so that it does not disturb the left and right aside.
OBSERVATIONS
4/4/19 (Week 1)
I observed at how it is important pays attention to the hierarchy and placement of the text and images to show clear readability. I also saw how designer design the "call to action" differently in each website.
11/4/19 (Week 2)
I observed at how each group came up with different ways of a user interface for the information kiosk.
24/4/19 (Week 4)
I observed at how html codes are formatted and used for headings, paragraphs, body and images.
2/5/19 (Week 5)
I observed at how css can create the appearance of the HTML in many different ways.
9/5/19 (Week 6)
9/5/19 (Week 6)
I observed how the background image can be adjusted and placed to match with the width and height of the website using CSS. I noticed how CSS beautifies the page and makes the page more readable as well.
16/5/19 (Week 7)
I observed how layout is important especially when dividing each content into separate sections which makes it easy to locate the information and it is much more easy to read rather than stacking all the text into one. I also saw how padding and margin is used to create appropriate spacing between the box element and content.
23/5/19 (Week 8)
I saw how my classmates design their layout according to the given content in many different ways which inspired me and gave me more ideas in designing the site layout and might use it for my project 2.
FINDINGS
4/4/19 (Week 1)
I found that not all award winning websites out there are the best web designs. I also found that aesthetic is not the only factor to make a good website. It is how we use the design principles to design the website.
11/4/19 (Week 2)
I found out creating a prototype is important and identifies the problems and issues when using the interface. It helps to know which parts should be improved.
24/4/19 (Week 4)
I found how special characters are inserted using a specific type of coding instead of just simply typing it in the html page.
2/5/19 (Week 5)
I discovered how HTML for "back to top" is used and how convenient it is for the user to click on the button that automatically brings them to the home page without having to scroll.
9/5/19 (Week 6)
I found out how other fonts that are downloaded online can be added into the font family in the CSS. I also discover that google fonts is one of the recommended application to use when choosing our own fonts that is not available in the default Dreamweaver.
16/5/19 (Week 7)
I found out how to use ID and Class Attribute better and I understand more on how to use them now since I added them to create my own layout. I also found out how to add hyperlinks within the text/words by highlighting them.
23/5/19 (Week 8)
I found out that the "back to top" button can be in a different style instead of using the common underlined button. It creates more aesthetic in the appearance and more readable.
_____________________________________________________________________________
FURTHER READINGS
Interface Design: An Introduction To Visual Communication In UI Design by David Wood
Week 1

Fig 6.1 Book Cover
Chapter: Visual communication: A standard in designing interaction
Designing for interaction flow
I learned that It is important that the UI design follows a common process when designing something for a client even though the deadline is short or long. Me as a designer can contribute to how I want to design the user interface using my client's objectives and needs.

Fig 6.2 Interactive flow between designer and client
Reference List:
Wood, D. (2014). Interface Design: An Introduction To Visual Communication In UI Design. Bloomsbury.
Wood, D. (2014). Interface Design: An Introduction To Visual Communication In UI Design. Bloomsbury.
Week 2

Fig 6.3 Book Cover
Chapter: The Design Process (Transitioning to wireframes)
I chose this book as we did a similar method of wireframe in our exercise of producing a user interface on paper. I want to know more about wireframing which I can use before designing the actual web page or application on a screen.
Basically, wireframing is basic blueprint that shows the core form and function found on a single screen of a web page or application. They usually use black black and white outlines and shapes to indicate the navigational elements, text, graphics that will be placed on the screen. This is an easier process before designing the existing site or application.
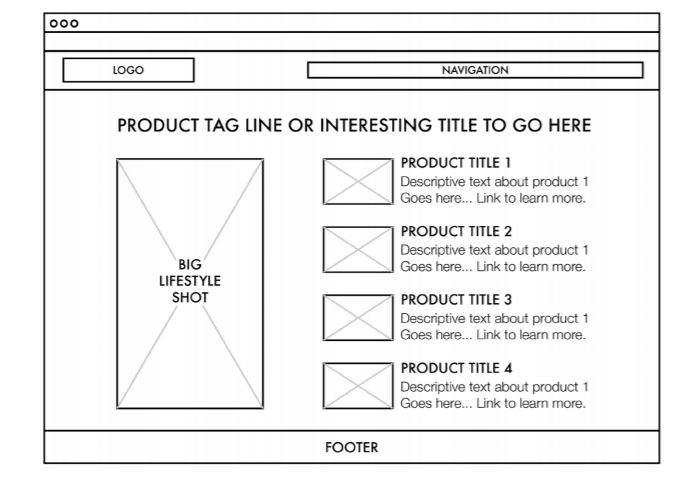
Fig 6.4 Example of wireframe for a website homepage
Reference List:
Hamm, M. J. (2014). Wireframing essentials: An introduction to user experience design. Mumbai, Packt Publishing
Building Your First Webpage
Chapter: Understanding Common HTML Terms
In this website, it teaches me about the basic terms to know when dealing with HTML and what I need to know whenever I need to build a webpage. The three common elements in HTML is elements, tags and attributes.
1. Elements
Elements define the structure and content of the objects within a page. The most frequent elements used include multiple levels of heading from <h1> to <h6> , paragraphs ( <p>) and many more ( <a>, <div>, <span>, <strong>, <em>)
They are identified by the use of angle brackets < > that surrounds the element name. One example of an element looks like this:
Example: <a>
2. Tags
The use of angle brackets surrounding an element creates a tag. Tags are often consist of both opening and closing tags.
An opening tag is used at the beginning of an element. For example: <div>.Whereas, a closing tag is used at the end of an element. For example: </div>
The content that is in between the opening and closing tags is the content of the element. For instance, an anchor link will have an opening tag <a> and closing tag </a>. The content of the anchor link is placed between those tags.
The anchor tags look like this:
Example: <a>...</a>
3. Attributes
They are properties that give additional information about an element. The most common attribute include the id attribute identifies an element. While the class attribute classifies an element.
The scr attribute specifies a source for embedded content. The href attribute provides a hyperlink reference to a linked source.
Attributes are describe within the opening tag, after an element's name. In general, attributes have a name and value. The format consists of attribute name with an equal sign and a quoted attribute value.
Example: <a href="http://shayhowe.com/">Shay Howe</a>

Fig 6.5 HTML syntax outline
Reference List: Learn.shayhowe.com. (n.d.). Building Your First Web Page - Learn to Code HTML & CSS. [online] Available at: https://learn.shayhowe.com/html-css/building-your-first-web-page/ [Accessed 10 May 2019].
Coding With Clarity by Brandon Gregory
Week 8
While browsing through the website, I found this article about how to make our codes readable and easy to understand.
To make and work with good codes, we need clarity by organizing them with careful planning and proper separation of ideas occurring before you open your code editor.
There are a set of basic principles that can help to achieve this code clarity.
1. The Single Responsibility Principle
It states that a block of code do one thing at a thing.
return { processForm: function() { getScores(); calculatePercentages(); createCharts(); showResults(); } };
2. Command-query Separation
It provides a basis of safeguarding your code against unintended side effects to avoid surprises when functions are called. The functions fall into one of two categories: commands, which perform an action, and queries that answer a question.
function getFirstName() { var firstName = document.querySelector("#firstName").value; firstName = firstName.toLowerCase(); setCookie("firstName", firstName); if (firstName === null) { return ""; } return firstName; } var activeFirstName = getFirstName();
Another example is this:
function getFirstName() { var firstName = document.querySelector("#firstName").value; if (firstName === null) { return ""; } return firstName; } setCookie("firstName", getFirstName().toLowerCase());
3. Loose Coupling
Coupling is a measure of how much one program unit relies on others. Too much coupling is rigid and should be avoided. It produces codes in better clarity.
var CollegeCourse = (function() { function createStudent_WRONG(firstName, lastName, studentID) { /* If the Student constructor changes, we'll have to modify this method and all calls to it, too! */ } function createStudent_RIGHT(optionsObject) { /* Passing an object as an argument allows the Student object to deal with the change. We may need to change this method, but we won’t need to change any existing calls to it. */ } }());
4. High Cohesion
Cohesion is a measure of how much each program units belong together. A high level of cohesion is good and adds clarity to code blocks. Higher cohesion is good and adds clarity to code blocks. For instance, like database functions or functions relating to a particular element in one block or module.
Ajax.Form.submitForm();
Ajax.Content.getContent(7);
Ajax.Login.validateUser(username, password);
From these principles, we can apply them when we deal with code editors and it can make our codes appear more readable and easy to understand.
Reference List: MacPherson, D. (2019). Coding with Clarity. [online] A List Apart. Available at: https://alistapart.com/article/coding-with-clarity/ [Accessed 22 May 2019].

Comments
Post a Comment